- HubPages»
- Technology»
- Computers & Software»
- Computer Science & Programming
Simple database development with sample Personal CDs Inventory

Personal CDs for software and/or for other things in time may get numerous enough to be misplaced for a while if not get lost permanently, needing some kind of organizing system.
Keeping track of personal CDs is a simple application that may be handled satisfactorily and promptly by data entry programs like Microsoft's "Excel", simply by Window's "Notepad", or even more simply by just plain old notebook.
A more sophisticated database system to record and keep track of the lot may also be developed and maintained through database programming softwares. The exercise gives a good introductory look for non-programmers into that mysterious universe of database programmers.
Four CD containers


Create first a blank database
This "Personal CD Inventory" system has for its main purpose to record and display a general description of CDs stored in different CD containers.
A database may be developed for it and maintained through the "Access" software accessible in "Microsoft Office". Later versions that Access may produce could vary much in operation to the two version referred for this hub, but generally the basic database principles for the system's development should be about the same.
The building of a simple yet usable database may follow these basic steps:
1. Create a blank database.
2. create tables in the database for various data expected. (each row on the table is a record with different kinds of information called "fields").
3. Create expected fields in tables as columnar space of table rows.
The database may be used as it is without further development. Information may be recorded at specific columns for each row on the table and browsed like the "Excel" software of Microsoft Office.
It may be enhanced further also by proceeding with one or more of the following important steps:
1. Create queries that relate a table with others through their fields.
2. Create forms for display of information
At creation Access sets a blank database with a default file name that may be overwritten with a preferred name (say "MyCDinventory" for 'Personal CD Inventory'). The file name extension if visible (".accdb" for Microsoft Access 2007, ".mdb" for Microsoft Access 2003) should not be erased. An option for locating the new database in a preferred folder is provided.
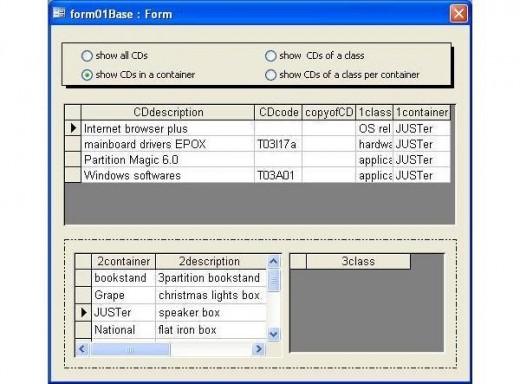
"Show CDs in a container" display
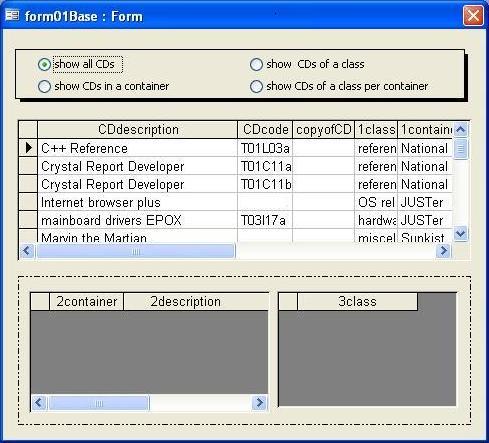
"Show all CDs" display
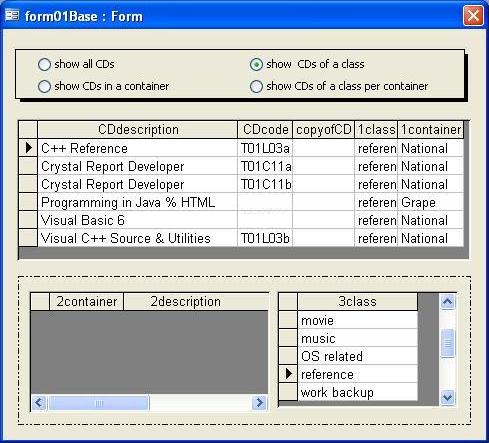
"Show CDs of a class" display
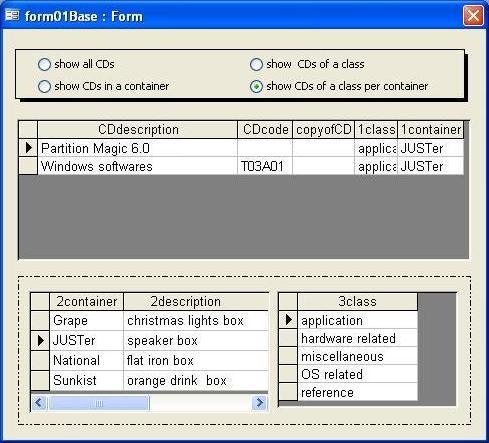
"Show CDs of a class per container" display
Database tables and queries

Create various tables in the database
Create next tables at the new database for different data. Tables are created in Access 2007 through the main menu option "Create">"Table". With Access 2003 it is created by the option "Tables">"New" then entering at a following screen the default entry ("Datasheet View") set for new tables.
In both cases Access presents a table format called "Datasheet View" that is used for entering/displaying data. The created table may be saved first with an appropriate name before proceeding further (a prompt box is opened to set the name with a save operation by clicking at a diskette icon).
With Access 2003 immediately saving produces the warning message that a "primary key" for the table was not defined and prompts wether or not the key may be created. If key is opted the table sets up with extra column for a numeric key that automatically increments for every row of additional data record on the table. Access 2007 on the other hand may automatically set at table creation the automatically incrementing numeric 'primary key'.
The objective of the above Personal CD Inventory system may require at least two tables:
(1) a table with rows for each personal CD, and (2) another table with rows for each container of personal CDs. The tables may be named, respectively, "1tableCD" and "2tableContainer".
A general classification for main content of CDs may also be useful. Some possible classes for the system are: reference, application, music, movie, OS related, hardware related, work backup, miscellaneous, etc. (one or more CD classes may exist in a container). Accordingly a third table named "3tableClass" may be added to the system.
Notes: table fields
Fields in tables are spaces for entering/viewing row record information. Two formats of tables may be used when dealing with its fields:
1. Design View - all fields are listed vertically with each field in a specification row. Each field may be focused and modified, deleted or added if not existing. Specification details for the field may be set at a bottom area labelled "Field Properties".
2. Datasheet View - all field names are displayed horizontally with each name at the head of a column. Rows may be entered with data under each field name, modified, deleted or browsed. All rows for records data on the table may be displayed.
An icon for the table may be 'right clicked' to change screen formats (for Access 2007, the 'Datasheet View' displayed at table creation time may not be changed until the created table is saved).
'Primary key' fields contain value unique only for each row at the 'Datasheet View' of the table. The field (or fields for a composite primary key) is marked with a key icon alongside it at the table's 'Design View'.
Fields have a "Data Type" which must be specified in the table's 'Design View' at the column next to the field name column. The 'Data Type' column may be clicked to specify available data types for the field. The 'Field Properties' specifications listing at the bottom area changes if 'Data Type' is changed.
Fields with "Text" as 'Data Type' are specified in 'Field Properties' with "Field Size" for entering expected number of characters. For text entry of undetermined large number of characters the field may be specified with "Memo" as 'Data Type'.
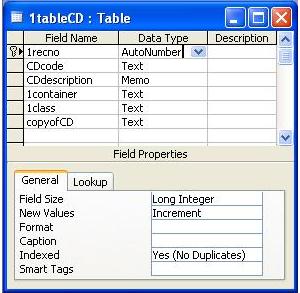
1tableCD design fields
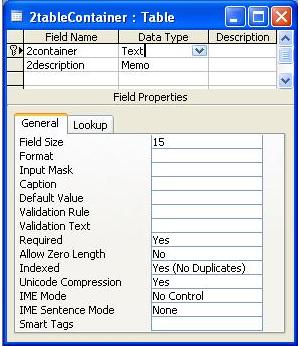
2tableContainer design fields
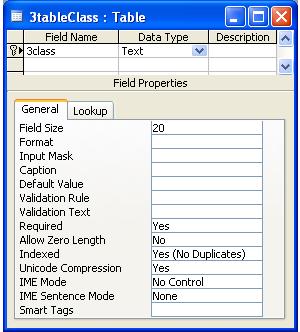
3tableClass design fields
Set significant fields in created tables
Use as 1tableCD 'primary key' the available automatic number field set with table creation. Rename the field as "1recno" (for record number). Set also a field for CD description and name the field "CDdescription". 'CDdescription' is specified with 'Memo' as 'Data Type'.
For 2tableContainer, the primary key is named "2container" with 'Data Type' as 'Text' and a 'Field Size' of 15_characters (automatic numbering not used). A visible short name descriptive of the container, like brand name in containers adapted from commercial boxes, may be entered in the field.
To cross reference a particular CD container with all of its CDs, 1tableCD should also have a field for container code which may be named "1container" (also 15_characters long). The code for a particular container would be at one row in 2tableContainer and at one or more rows in 1tableCD.
For 3tableClass, the primary key is named "3class" with 'Data Type' as 'Text' and a 'Field Size' of 20_characters (automatic numbering not used).
To cross reference a particular class with all of its CDs, 1tableCD should also have a field for class code which may be named "1class" (also 20_characters long). The code for a particular class would be at one row in 3tableClass and at one or more rows in 1tableCD.
Notes: Look up a table's field value with other tables
To limit data entry to valid values, input to fields of tables may be restricted by "Combo Box" control that gives a dropdown list set with valid field values from other tables.
The field may feature a 'Combo Box' control through the table's 'Design View' as follows: (1) With the field focused click the 'Lookup' tab under 'Field Properties' (2) Under 'Lookup' at the row labelled "Display Control" click the defaulted value of "Text Box" and select "Combo Box" from the dropdown list provided
New specification rows display upon replacement of "Text" with "Combo Box" at the 'Display Control' row. The significant new rows are "Row Source Type", "Row Source", "Bound Column" and "Limit To List".
The 'Row Source Type' value defaults to "Table/Query" and need not be changed. 'Row Source' value may be clicked to select from a dropdown list the name of the table looked up.
'Bound Column' is for the position of the corresponding field at a record of the table looked up and has a default value of 1; it need not be changed if the field is the record's first field. 'Limit To List' value defaults to "No" and may be clicked to change to "Yes". (Other specification rows may have their default values.)
Look up 2 fields from 1tableCD

Look up '1Container' value with 2tableContainer
For '1Container' field of 1tableCD in Design View: (1) click the 'Lookup' tab under 'Field Properties', (2) at the "Display Control" row under 'Lookup' click the defaulted value of "Text Box" and replace with "Combo Box" from its dropdown list.
With "Combo Box" set at the 'Display Control' row, click the value for the 'Row Source' row and select "2tableContainer" from its dropdown list.
Two other significant rows may be specified as follows: (1) 'Bound Column'=1 (2) 'Limit To List'="Yes".
Look up '1Class' value with 3tableClass
For '1Class' field of 1tableCD in Design View: (1) click the 'Lookup' tab under 'Field Properties', (2) at the "Display Control" row under 'Lookup' click the defaulted value of "Text Box" and replace with "Combo Box" from its dropdown list.
With "Combo Box" set at the 'Display Control' row, click the value for the 'Row Source' row and select "3tableClass" from its dropdown list.
Two other significant rows may be specified as follows: (1) 'Bound Column'=1 (2) 'Limit To List'="Yes".
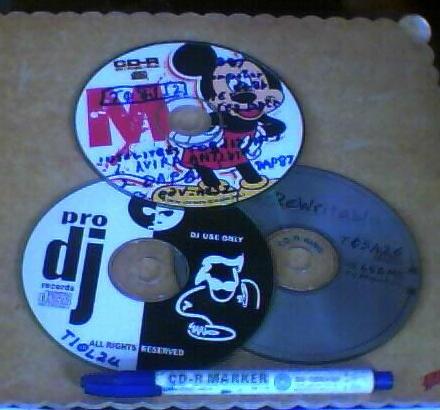
CD marker with 3 marked CDs
set other fields to tables
Set at 1tableCD the following additional fields:
1. "CDcode" - 'Data Type'="Text", 'Field Size'=7_characters (may be used for some types of manual checking; some CDcodes may have no entry; for computer processing, the automatically assigned record number that was renamed to '1Recno' is used for CD record identification.)
2. "copyofCD" - 'Data Type'="Text", 'Field Size'=7_characters (use for CDs copied from other CDs.)
Selected CDs may be marked manually on the upper surface for entry to fields 'CDcode' and 'copyofCD' (sign pens suitable for marking CDs may be availed from computer supply stores or from bookstores).
Coding rules that are easily remembered and implemented may be used. The 7-caracter codes as used here were derived from certain dates, like the date the CD was first accquired or else marked.
The dates' century and month parts were replaced by equivalent alphabetical sequence codes to give 6 characters for the date code (ie: the code for 2012_February_1 is T12B01). A seventh character for the code structure is reserved for suffix letter to take care of special CDs coded with the same dates.
(The code may be shortened further by omitting the century part and/or replacing the year part with a single letter; ie, the date sampled above may be coded as LB01. )
A CDcode (rather than the CD's automatic record number) is used when referencing for the source copy of copied CDs.
In some cases though the source CD may not be visibly marked or it may be preferable not to mark the CD. If so a dummy CDcode may be used: a notable character like "x" may be used to replace the century portion of a date code or may be prefixed to the code.
(Containers with no visible marks or characteristics for easy identification may be marked with code through the same date coding scheme.)
Set at 2tableContainer the following additional field:
1. "2Description" - 'Data Type'="Memo" (for details about the container.)

Databases with Access

Notes: forms
Screen reports in Access are displayed through "Forms". The form may be created and saved first with an appropriate name before developing further.
A blank form with plain layout may be created at an opened database for Access 2007 by the main menu option "Create">"Form Design". In Access 2003 the form may be created by the option "Forms">"New".
In Access 2003 the window "New Form" also displays for setting other specifications (select "Design View" from a list; the name of a data reference table or query, also called "Record Source", for the form may be also be set through a combo box). The "New Form" window is not used for form creation in Access 2007.
Only the form's "Detail" section is initially created. If needed, the available "Form Header/Footer" sections or else the "Page Header/Footer" sections may also be attached by 'right clicking' any part of the form and selecting the sections from the menu provided.
Specifications for property of the form or components may be set by clicking an icon with a hand pointing to a sheet. The icon is labelled "Property Sheet" in Access 2007 but called "Properties" in Access 2003 (it will be referred to as "Properties" in succeeding discussions).
A 'Properties' specification sheet window may display at form creation along with the new form being created. The entire form or else one of its sections (Detail, Header, Footer - Form or Page) may be separately specified at the 'Properties' window.
A form or section on focus has indicator or highlight for reference in design. The entire form is on focus if there is a small square dot in the small clickable square at the form's topmost left corner. For section focusing, the clickable labelled bar on top of the section darkens.
Editing for 'Properties' setting in a form or section is done with its focus highlighting on. The focus may also be specified through a combo box above the specification tabs at the 'Properties' window.
Data reference for the form may be specified at the "Data" tab of the 'Properties' window. A row for the tab labelled "Record Source" may have entry for table name, query name or else program code that gives the reference.
Design view of 'form01Base' (CDs screen display form)

Option Group icon

create form for CDs screen display
Create a blank form first then save with the name "form01Base". This first screen display for 'Personal CD Inventory' shall display CD record listings in any of 4 options with the following CD groupings:
1. show all CDs
2. show CDs in a container
3. show CDs of a class
4. show CDs of a class per container
Next provide options for 4 CD groupings by dragging in at the top part the form control "Option Group" (the icon for 'Option Group' is a rectangle with the 3 letters xyz on the top side) .
The 'Option Group' is named "fraCDgrouping" when finished and set with the above CD groupings in 4 "Label Names" corresponding to 4 "Option buttons". Each button has the default numeric values 1,2,3 or 4 (long integer data type). The group's style is set to "Shadowed" and all other settings use defaults. The value of 'fraCDgrouping' for programming purposes is the numeric value of the button pressed.
Subform/Subreport icon

Notes: subform on the 'Form'
An icon called "Subform/Subreport" may be dragged and drawn at appropriate areas of the form to insert subforms that can display various reporting screen layouts with different 'Record Source' data (the icon is a sunken rectangle enclosing 4 lines and 2 small rectangles).
A "Subform Wizard" is displayed for specifying the inserted subform. Select the option "Use existing Tables and Queries" at its first window. Specify at a succeeding window the associated table or query ('Record Source') with their fields. A name for the subform is specified at the last window.
The 'Properties' icon may be used on the subform after creation (similarly as discussed above for 'Form notes').
Access database design and programming

insert CD listing subform at 'form01Base'
(Name the subform "form01SubfmCD" at end of insertion.) Drag/draw the icon 'Subform/Subreport' to below 'fraCDgrouping'. Specify '1tableCD' as record source and include the fields 'CDdescription', 'CDcode', 'copyofCD', '1class', '1container'.
After insertion click the 'Properties' icon and edit 'form01SubfmCD' as foll0ws...
>A< With 'Form' in focus for 'Properties' set (1) at the 'Data' tab: 'Allow Edits'="No", 'Allow Deletions'="No", 'Allow Additions'="No".
>B< With 'Properties' still open click the entry for each field in the 'Detail' section and set (1) at the 'Data' tab, for fields 'CDdescriptiont' 'CDcode', 'copyofCD', '1class', '1container': 'Enabled'="No", 'Locked'="Yes", (2) at the 'Other' tab, for field '1class': 'Name'="bst1class", for field '1container': 'Name'="bst1container".
Click on any part of the subform perimeter to allow WYSISWYG dimensional changes and to move the subform around (the perimeter will be highlighted, and passing the mouse cursor over a perimeter side changes the cursor to a form that hints of result for mouse movement).
Make visual changes to the subform as appropriate.
insert container selection subform at 'form01Base'
(Name the subform "form01SubfmContainer" at end of insertion.) Drag/draw the icon 'Subform/Subreport' to below "form01SubfmCD" on the left side of 'form01Base'. Specify '2tablecontainer' as record source and include the fields '2container', '2description'.
After insertion click the 'Properties' icon and edit 'form01SubfmContainer' as follows...
>A< With 'Form' in focus for 'Properties' set (1) at the 'Data' tab: 'Allow Edits'="No", 'Allow Deletions'="No", 'Allow Additions'="No".
>B< With 'Properties' still open click the entry of each field in the 'Detail' section and set (1) at the 'Data' tab, for fields '2container' and '2description': 'Enabled'="No", 'Locked'="Yes", (2) at the 'Other' tab, for field '2container': 'Name'="bstContainer".
Click on any part of the subform perimeter to allow WYSISWYG dimensional changes and to move the subform around (the perimeter will be highlighted, and passing the mouse cursor over a perimeter side changes the cursor to a form that hints of result for mouse movement).
Move left the perimeter's right side to shorten the subform's width and to give space for inserting a class selection subform. Make visual changes to the subform as appropriate.
insert class selection subform at 'form01Base'
(Name the subform "form01SubfmClass" at end of insertion.) Drag/draw the icon 'Subform/Subreport' to the right of 'form01SubfmContainer'. Specify table '3tableClass' as record source and include the field '3class'.
After insertion click the 'Properties' icon and edit 'form01SubfmClass' as follows...
>A< With 'Form' in focus for 'Properties' set (1) at the 'Data' tab: 'Allow Edits'="No", 'Allow Deletions'="No", 'Allow Additions'="No".
>B< With 'Properties' still open click the entry of the field in the 'Detail' section and set (1) at the 'Data' tab, for field '3class': 'Enabled'="No", 'Locked'="Yes", (2) at the 'Other' tab, for field '3class': 'Name'="bstClass".
Click on any part of the subform perimeter to allow WYSISWYG dimensional changes and to move the subform around (the perimeter will be highlighted, and passing the mouse cursor over a perimeter side changes the cursor to a form that hints of result for mouse movement).
Make visual changes to the subform as appropriate.

Visual Basic for Application of Access

Notes: programming for conditional display of records
Data records on each of the above 3 subform controls may conditionally be displayed using query and the "Visual Basic for Application" (VBA) programming language in Access based on info from the 'fraCDgrouping' control of 'form01Base'. Record display on the CD subform would also need info from the 2 other subform controls.
Queries may display selected records from tables specified through VBA program code in the "Query by Example" grid (or QBE grid) screen at the 'Criteria' speciofication row.
A query with appropriate VBA criteria coding may replace the previous table name entry at the 'Record Source' specification (at the 'Properties' Data tab) for each and all subforms controls.
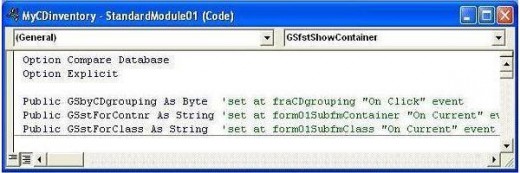
Create first a 'Standard Module' for program codes and save with name "StandardModule01".
In Access 2007 a 'Standard Module' may be created from the main menu by the option "Create">"Macro">"Module" (or "Create">"Module", or else "Create">"Class">"Module" depending on which option was previously used). In Access 2003 a 'Standard Module' may be created by the option "Modules">"New".
When created 'StandardModule01' at first may only have one line with the codes "Option Compare Database" (this is on a module part called 'Declaration Section'). Enter also at the second line the codes "Option Explicit" to require variable declaration before use. The 'Declaration Section' may have these first two lines followed by other lines for global variables and/or other declarations. Globally declared codes are preceeded by the keyword "Public".
Assign global variables in a 'Standard Module' for cross referencing between subforms and set their values set through the 'Event' tab of 'Properties' with the approriate subform or else 'fraCDgrouping' on focus.
Events on a form/subform may be programmed by clicking at the 'Event' tab the ellipsis (...) button for a particular event (say 'On Current'). For new codes of the event a 'Choose Builder' prompt box displays for entering the kind of entry (select 'Code Builder').
A 'Form Module' screen on the form event displays for entering 'Sub' procedure codes (if a first entry for the form the line "Option Explicit" should be entered at the 'Declaration Section' of the module after the first line containing "Option Compare Database".
'Form Module' may also be opened by clicking, while form/subform is in focus, on an icon called "View Code" in Access 2007 (the icon is called "Code"in access 2003).
VBA 'Function' procedures are used at the 'Criteria' row of queries to display records in subform controls of 'form01Base'. If a query row is to be displayed, the function outputs value as 'Criteria' equal to a certain value taken from the same row. Values from the row are inputted to the function as parameters and compared with global variables to determine the criteria.
Standard module (01) declaration with global variables
Set global variable values for 'fraCDgrouping'/subforms
At the declaration section of 'StandardModule01' after the 'Option Explicit' line, assign the global variables named "GSbyCDgrouping", "GSstForContnr", "GSstForClass" through the following declaration lines (exclude line numbers):
#1 Public GSbyCDgrouping As Byte 'set at fraCDgrouping "On Click" event
#2 Public GSstForContnr As String 'set at form01SubfmContainer "On Current" event
#3 Public GSstForClass As String 'set at form01SubfmClass "On Current" event
Events that set global variable values


Set global variable values for 'fraCDgrouping'/subforms
Enter at the 'On Click' event in 'Properties' for 'fraCDgrouping' the following lines (exclude line number):
#1 With Me
#2 GSbyCDgrouping = Nz(.fraCDgrouping)
#3 .Refresh
#4 End With
Notes: (1) In a 'Form Module' the code "Me" may replace the form name, which in line #1 above is for 'form01Base' (2) The entries after the period in lines #2 and #3 were set through a selection list of controls/obects on form 'form01Base' that should appear when the period is entered (3) 'fraCDgrouping' is a control at 'form01Base'.
Enter at the 'On Current' event in 'Properties' for 'form01SubfmContainer' the following line (exclude line number):
#1 GSstForContnr = Me.bstContainer
Enter at the 'On Current' event in 'Properties' for 'form01SubfmClass' the following line (exclude line number):
#1 GSstForClass = Me.bstClass
Programming: CD display at 'form01SubfmCD'
Enter the numbered lines below into 'StandardModule01'as a function procedure named "GSfloShowCD" (exclude line numbers). The function is global and set at the 'Criteria:' row of the query ("query01SubfmCD") used as 'Record Source' for 'form01SubfmCD'.
The function inputs parameters that are used for comparison with global variables and for the function's output. The parameters are query row values for '1Container', '1Class' and '1Recno' (record number) from the CDs table (1tableCD). The query displays a row if the function outputs a value that is the same as the record number on the row.
`#1 Public Function GSfloShowCD(ByVal pst1Container As String, _
ByVal pst1Class As String, ByVal plo1Recno As Long) As Long
`#2 GSfloShowCD = 0 'default value
`#3 'Option to "show CDs in a container"
`#4 If GSbyCDgrouping = 2 Then
`#5 If pst1Container = GSstForContnr Then
`#6 GSfloShowCD = plo1Recno
`#7 End If
`#8 'Option to "show CDs of a class"
`#9 ElseIf GSbyCDgrouping = 3 Then
#10 If pst1Class = GSstForClass Then
#11 GSfloShowCD = plo1Recno
#12 End If
#13 'Option to "show CDs of a class per container"
#14 ElseIf GSbyCDgrouping = 4 Then
#15 If pst1Container = GSstForContnr Then
#16 If pst1Class = GSstForClass Then
#17 GSfloShowCD = plo1Recno
#18 End If
#19 End If
#20 'Option to "show all CDs"
#21 Else
#22 GSfloShowCD = plo1Recno
#23 End If
#24 End Function

Structured Query Language (SQL)

Notes: Query creation/design
A query may be created by the main menu option "Create">"Query Design" (Access 2007). With Access 2003 it is created in an opened database by the option "Queries">"New" then selecting "Design View" in the screen provided.
A 'QBE grid' screen is displayed for creating/designing/modifying a query with a "Show Table" screen displayed to set reference tables and/or other queries on the grid.
The created query may first be saved with an appropriate name after setting a table before making further specifications. The "Show Table" screen must be closed to enable saving; it may be reopened by clicking on an icon with a plus sign above the top left corner of a table symbol.
Fields for display may be selected from tables and dragged to query columns at the lower part of the 'QBE grid'. Dragging an asterisk ("*") from the table to a column selects all fields of the table.
For certain specifications without displaying the field duplicates may be dragged to separate columns but conditioned not to display by removing a check mark at the "Show:" row below the duplicate.
Records on a query may be conditioned wether to display or not by entering below a dragged field on the "Crideria:" row a possible value for the field. Alternate criteria for the same field may be specified at the "or:" row below. A 'Crideria:' specification on another column may specify "and:" condition criteria for the record.
A record may display if the value of its field equals the 'Crideria:' row value/s or else satisfies a comparison symbol ( >, <, <>, =>, <= ) entered before the value at the 'Criteria:' row. An actual value or else a program code that gives the value may be entered on the 'Criteria:' row.
Sorting on a dragged field of the query may be specified at the "Sort:" row by combo box sorting options "Ascending", "Descending" or "(not sorted)".
Two or more tables and/or queries may be related on the 'QBE grid' through the field list displayed for each. Drag a field from one list to a corresponding field in another list to indicate that the tables/queries are related through those fields (a relationship arrow from field to field is set).
Right click the relationship arrow to specify "Join Properties" between tables/queries as one of the following, assuming two tables named "tableA" and "tableX": (1) Only include rows where the joined fields from both tables are equal, (2) Include ALL records from 'tableA' and only those records from 'tableX' where the joined fields are equal (3) Include ALL records from 'tableX' and only those records from 'tableA' where the joined fields are equal.
(The QBE grid specification has a generated string of codes in "Structured Query Language" or SQL format which may be put in a procedure or variable for modification and/or use in VBA programming. The string related functions of VBA and its string operator of the character_"&" may be used for programming.)
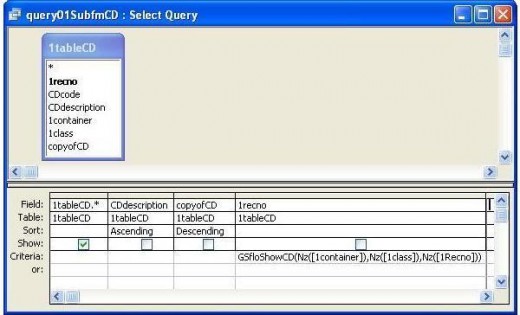
Query: 'Record Source' of 'form01SubfmCD'
Set a 'QBE grid' with the table '1tableCD' then save with the name 'query01SubfmCD'.
Drag '1tableCD' fields to specification columns on the lower portion and specify as follows:
column1- (1) Field: Asterisk, or 1tableCD.*
column2- (1) Field: CDdescription (2) Show: No (3) Sort: Ascending
column3- (1) Field: copyofCD (3) Show: No (3) Sort: Descending
column4- (1) Field: 1Recno (2) Show: No
(3) Criteria: GSfloShowCD(Nz([1container]),Nz([1class]),Nz([1Recno]))
Query for 'Record Source' of 'form01CD'
Programming: container display at 'form01SubfmContainer'
Enter the numbered lines below into 'StandardModule01' as a function procedure named "GSfstShowContainer" (exclude line numbers). The function is global and set at the 'Criteria:' row of the query ("query01SubfmContainer") used as 'Record Source' for 'form01SubfmContainer'.
The function inputs parameters that are used for comparison with global variables and for the function's output. The parameters are query row values for '2container' from the container table (2tableContainer) and for '1Container' from the CDs table (1tableCD). The query displays a row if the function outputs a value that is the same as the container on the row.
`#1 Public Function GSfstShowContainer (ByVal pst2Container As String, _
ByVal pst1Container As String) As String
`#2 GSfstShowContainer = "Show-No" 'default value
`#3 'Option to "show CDs in a container"
`#4 If GSbyCDgrouping = 2 Then
`#5 GSfstShowContainer = pst2Container
`#6 'Option to "show CDs of a class per container"
`#7 ElseIf GSbyCDgrouping = 4 Then
`#8 If pst2Container = pst1Container Then
`#9 GSfstShowContainer = pst2Container
#10 End If
#11 End If
#12 End Function
Enter at the 'On Click' event in 'Properties' for 'form01SubfmContainer' the following lines (exclude line number):
#1 With Form_form01Base
#2 .form01SubfmContainer.Requery
#3 .Refresh
#4 End With
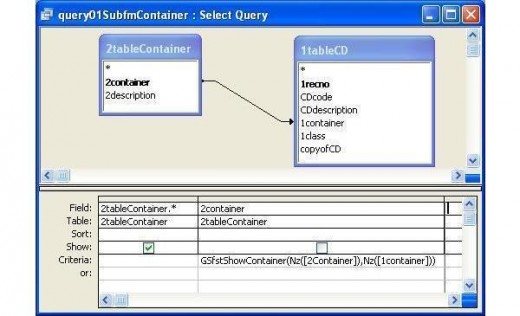
Query: 'Record Source' of 'form01SubfmContainer'
Set a 'QBE grid' with the tables '2tableContainer' and '1tableCD' then save with the name 'query01SubfmContainer'.
Drag the '2Container' field in '2tableContainer' to the '1Container' field in '1tableCD' and specify the 'Join Properties' as "Include ALL records from '2tableContainer' and only those records from '1tableCD' where the joined fields are equal".
Drag '2tableContainer' fields to specification columns on the lower portion and specify as follows:
column1- (1) Field: Asterisk, or 2tableContainer.*
column2- (1) Field: 2Container (2) Show: No
(3) Criteria: GSfstShowContainer(Nz([2Container]),Nz([1Container]))
Query for 'Record Source' of 'form01Container'
Programming: class display at 'form01SubfmClass'
Enter the numbered lines below into 'StandardModule01' as a function procedure named "GSfstShowClass" (exclude line numbers). The function is global and set at the 'Criteria:' row of the query ("query01SubfmClass") used as 'Record Source' for 'form01SubfmClass'.
The function inputs parameters that are used for comparison with global variables and for the function's output. The parameters are query row values for '3class' from the class table (3tableClass) and for '1Class' from the CDs table (1tableCD). The query displays a row if the function outputs a value that is the same as the class on the row.
`#1 Public Function GSfstShowClass (ByVal pst3Class As String, _
ByVal pst1Class As String) As String
`#2 GSfstShowClass = "Show-No" 'default value
`#3 'Option to "show CDs of a class"
`#4 If GSbyCDgrouping = 3 Then
`#5 GSfstShowClass = pst3Class
`#6 'Option to "show CDs of a class per container"
`#7 ElseIf GSbyCDgrouping = 4 Then
`#8 If pst3Class = pst1Class Then
`#9 GSfstShowClass = pst3Class
#10 End If
#11 End If
#12 End Function
Enter at the 'On Click' event in 'Properties' for 'form01SubfmClass' the following lines (exclude line number):
#1 With Form_form01Base
#2 .form01SubfmClass.Requery
#3 .Refresh
#4 End With
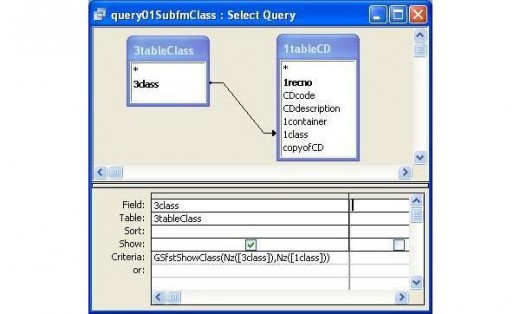
Query: 'Record Source' of 'form01SubfmClass'
Set a 'QBE grid' with the tables '3tableClass' and '1tableCD' then save with the name 'query01SubfmClass'.
Drag the '3Class' field of '3tableClass' to the '1Class' field of '1tableCD' and specify the 'Join Properties' as "Include ALL records from '3tableClass' and only those records from '1tableCD' where the joined fields are equal".
Drag '3tableClass' fields to specification columns on the lower portion and specify as follows:
column1- (1) Field: 3Class
(2) Criteria: GSfstShowClass(Nz([3Class]),Nz([1Class]))
Query for 'Record Source' of 'form01Class'
Finishing touches
At form01Base 'Design View'...
>A< Focus respectively on subforms form01subfmCD, form01subfmContainer, form01subfmClass and specify for each through the 'Properties' screen at the 'Format' tab as follows:
(1) Navigation Buttons=No, Dividing Lines=No, Border Style=Dialog, Min Max Buttons=Disabled, Close Button=No, (2) Scroll Bars=Both, Record Selectors=Yes
>B< Enclose with a rectangle both of the subforms form01subfmContainer and form01subfmClass (the rectangle tool icon is a simple rectangle labelled "rectangle"). With rectangle in place and in focus open the 'Properties' screen and specify at the 'Format' tab: 'Border Style'="Dash Dot Dot".
Visual Basic and database

Last notes
Standardizing names used in programs with conventions, a recommended practice in the development of large systems, was not strictly followed here for clearer and shorter presentation.
The usual way in conventions is to affix standardized prefixes of some few characters (often letters) before common root words when naming a program variable, procedure, control, etc.
For this hub some appropriate practices were followed from various references as well as from personal works of this writer.
Variables and procedures here declared in a standard module as global using the declaration keyword "Public" follow the writer's practice of using as prefix 2 capital letters ("GS") followed by 2_or_3 small letters (the ending 2_small letters gives data type; "xx" if no data type).
It is a variable if the prefix has only 2_small letters, and a function procedure if it has 3_small letters that begin with an "f".


 Project System Functional Requirements Document")

